I. Introduction
Two home booster pumps with identical motor power can show quite diverse outcomes after installation. The correct decision depends upon the source of the water, the amount of pressure currently present, the number of outlets working together, and the height the water must be lifted. This tutorial gives you a straightforward approach to follow for selecting models or creating a product range.
II. Main Types of Home Booster Pumps
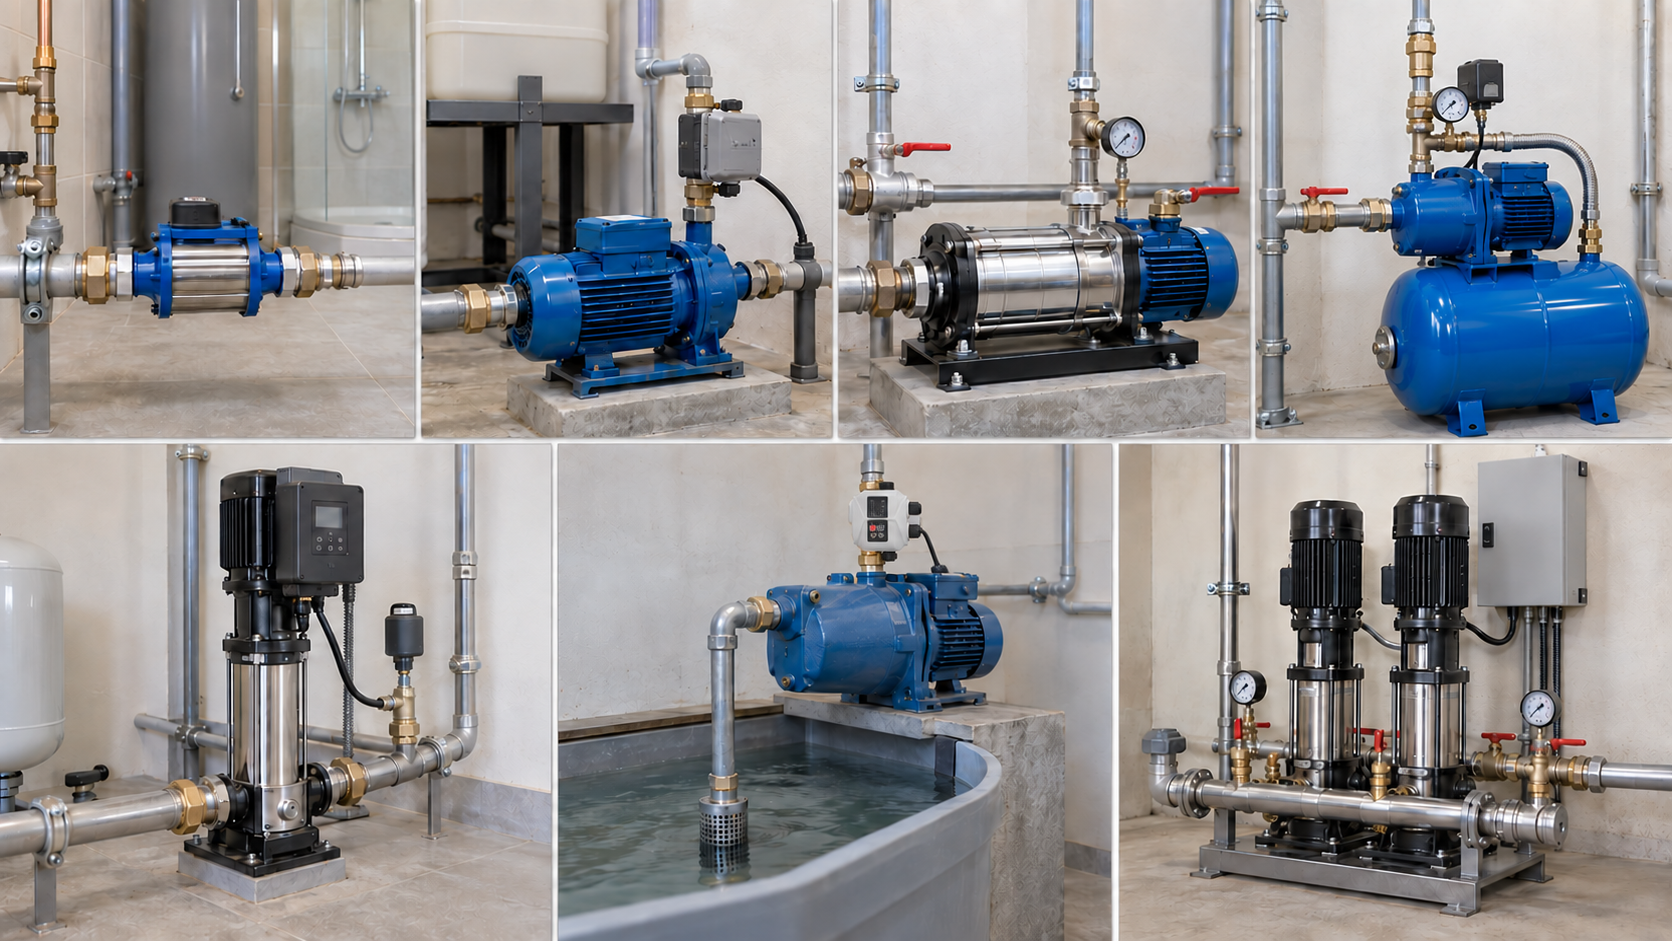
1. Compact Inline Booster Pumps
Compact inline booster pumps are mounted directly into an existing water pipe. They are typically used to provide pressure to a shower, a water heater, a kitchen tap, or a small group of outlets that already have a continuous water supply.
2. Fixed-Speed Automatic Booster Pumps
Fixed-speed automatic booster pumps run at full speed when started by a pressure switch or an automatic controller for the motor. They are generally used in conjunction with roof tanks and water pipelines with a consistent intake supply.
3. Multistage Booster Pumps
Multistage booster pumps employ many impellers to ratchet up the pressure in stages. They are suitable for multi-storey residences, lengthy runs of pipe, rain showers, and other systems where greater pressure is needed at a useful flow rate.
4. Booster Pumps with Pressure Tanks
These systems include a pump, pressure tank, pressure switch, pressure gauge and check valve. The tank holds a tiny volume of pressurized water and decreases the number of times the pump goes on during brief periods of water use.
5. Variable-Speed Booster Pumps
Variable speed booster pumps employ a pressure sensor and inverter controller to vary the motor speed to match fluctuations in the water demand. They are generally employed where numerous outlets can come together and the system requires a steadier pressure.
6. Self-Priming Automatic Booster Pumps
After filling the pump casing, self-priming automated booster pumps can be used to draw water from an underground tank, lower storage tank or shallow well. They combine suction and pressure boosting with automatic start-stop control.
7. Twin-Pump Booster Systems
Twin-pump systems employ two pumps that operate alternatively, together, or as duty and standby units. They are usually employed in big villas, in shared dwellings, and in systems with high peak demand for water.
These kinds may overlap. For example, a multistage pump may be run with fixed-speed or variable-speed control, and a self-priming pump can be run with an automatic controller or pressure tank.
III. Home Booster Pump Selection Process
1. Identify the Water Source
First, find out if the water is from a municipal pipe, a roof tank, an underground tank, a ground-level storage tank, or a shallow well. You can utilize a positive-inlet booster pump if water can flow naturally into the pump inlet. If the water level is below the pump, you need a self-priming model and you should check the actual suction height.
Measure from the lowest level of water expected to be present (for tanks and wells, not the top of the tank). Also record the horizontal suction pipe length, pipe size, and number of bends. These add resistance and diminish actual suction performance. This initial step avoids you from selecting a pump that will have enough flow and head but won’t be able to pull water from the source.
2. Calculate Simultaneous Water Demand
The number of outlets in the building is irrelevant. What is relevant is the number of outlets that may run simultaneously. Ask whether showers, taps, toilets, washing machines, water heaters, and garden outlets are likely to be in simultaneous use at peak times in the morning or evening.
For instance, two showers at 10 L/min and two taps at 6 L/min lead to a peak demand of around 32 L/min. For initial product grouping, 40-60 L/min may be appropriate for many smaller whole-house systems, 60-100 L/min may serve higher simultaneous demand, and over 100 L/min may be required for large residences or communal water systems. The flow ranges below are beginning points, and you should still utilize the real fixture flow when picking the final model.
3. Set the Required Outlet Pressure
Check the needed pressure at the highest or most remote outlet. A simple tap, a rain shower, a water heater, a filter, and a tankless toilet may all have varied inlet pressure requirements. So the aim should be the equipment with the highest pressure requirement.
The exact setting depends on the piping and linked equipment, although many household systems work within roughly 2–4 bar at the outlet. Separating the pressure already present at the pump inlet from the additional pressure the pump has to provide is also necessary. If the intake already has 1 bar and the output requires 3 bar, the pump does not have to provide the full 3 bar until the height and pipe loss consume the existing pressure.
4. Calculate the Required Pump Head
This instruction is for a system with positive inlet pressure. You can use:
Required Pump Head = Required Outlet Pressure Head + Vertical Height + Pipe Loss – Minimum Inlet Pressure Head
One bar is around 10 m of water head. Always run at minimum inlet pressure during peak hours, as the pressure available during light use can be substantially higher. Pipe loss should be computed at the needed flow and should include straight pipe, bends, valves, filters, heaters, and other items that slow the water down.
For a pump drawing from an open tank below the installation level, there is no positive inlet pressure to subtract. You have to consider the vertical distance from the lowest water level to the highest outlet, the pressure necessary at the outlet, and all suction and discharge pipe losses.
5. Match the Working Point on the Pump Curve
The needed flow and pump head define the functioning point of the pump. Find this point on the performance curve and choose a model that can deliver the needed flow at that head. The operating point must be within the typical operating range of the pump and not at the far end of the curve.
Maximum flow is usually taken at extremely low head and maximum head with little or no flow. A pump labelled maximum head 40 m will not give its maximum flow at 40 m. You will avoid selecting a pump that appears to be doing well from the nameplate but is actually producing too little water after installation by using the full curve.
For your sales material, it is useful to indicate the flow at normal operating pressures like 2 bar, 3 bar, and 4 bar. Then your sales staff can compare models based on the pressure and flow that the buyer would receive, instead of two disconnected maximum figures.
6. Choose the Control Method
The optimum choice in cases of constant and low water demand with acceptable pressure fluctuations is a fixed-speed automated pump. The pump runs at full speed till the pressure drops or water starts to flow, and stops as soon as the demand is over or the cut-out pressure is reached.
In case of high variability of open outlets, a variable-speed booster pump is preferable. It can slow down when there is lower demand and speed up when more water is utilized, helping the system maintain a steadier pressure. Verify that the pump can still deliver maximum flow at the selected pressure level, since variable-speed control cannot force an undersized pump to exceed its hydraulic limit.
If you have a lot of short uses of the system, such as hand washing or toilet filling, having a pressure tank is handy. It stores a little bit of pressurized water and reduces short cycling. The tank should be selected on the basis of its usable drawdown and not on the basis of its overall volume. The pump must be able to reach the cut-out setting of the pressure switch.
7. Match the Pump Type to the Water Source and Pressure Need
If water is already at the pump, a tiny inline pump is a useful option for local pressure boosting. If your water supply is subterranean or shallow, a self-priming pump is a better choice. If you have multiple floors and need higher pressure at the needed flow, a multistage pump is good.
A self-priming pump is not always the best for high pressure, and a multistage pump is not always self-priming. First, do the water supply, flow, and head calculations. Then utilize the pump type to satisfy those criteria. This prevents the name of the product from overriding the real selection work.
8. Check the Installation Conditions
Check the space surrounding the pump and where it is going to be fitted. Pumps near kitchens, bedrooms or bathrooms require extra consideration to running noise, vibration, cooling and pipe movement. A larger pump with a pressure tank may be easier to fit in a roof area, basement or separate pump room.
Also check the inlet and output direction, pipe size, installation position, and access for basic service. A pump may be correct for the flow and head needed, but inappropriate in that it cannot be fitted to the pipe layout or it produces too much noise for the region of installation.
9. Avoid Oversizing the Pump
A bigger motor doesn’t always mean a better supply of water. An oversized pump can generate excessive pressure, start and stop too fast, be noisier, or shift the working point outside the typical range of the pump.
Size it to provide adequate capacity for normal fluctuations in inlet pressure, pipe friction loss, and water demand, but don’t specify a substantially larger size without reviewing its performance curve. A good flow-and-pressure chart on every model can help your sales staff explain why the nearest higher-power pump is not always the appropriate choice.
10. Use a Standard Selection Form
Collect the water source, minimum inlet pressure, minimum tank water level, outlet pressure required, simultaneous flow, vertical height, pipe length, pipe size, voltage, frequency and installation position before choosing a model. For automatic pumps, also ask if the system requires fixed-speed control, constant pressure, a pressure tank, or dry-run protection.
The same form for every inquiry means a clear approach for your sales team and makes it easy to validate model recommendations. It also provides the factory with enough information to check the functioning point, rather than choosing a pump based on motor power alone.
IV. A Practical Home Booster Pump Selection Example
1. Working Conditions
Suppose a 3-floor house and a municipal water pipe that is authorized to be directly boosted. The minimum inlet pressure to the pump is 1 bar, the highest shower requires 3 bar, the vertical height from the pump to that shower is 8m, and the pipe loss at the needed flow is estimated at 3m. There are two showers and additional probable outlets with a maximum demand of 60 L/min.
2. Flow and Head Calculation
The pump must provide 60 L/min during peak use. The required added head is:
Required Pump Head = 30 m + 8 m + 3 m − 10 m = 31 m
The pump must therefore deliver about 60 L/min at 31 m head. A model with a maximum head of 31 m would not work because its flow would be close to zero at that point. You need a pump whose performance curve passes through 60 L/min at around 31 m while keeping the working point inside its normal range.
3. Final Pump Selection
Since the water is at positive pressure when it reaches the pump, the system does not have to be self-priming. The three-story arrangement and the varying number of open outlets do make a multistage booster pump with variable speed a realistic solution. If the pressure sensor is placed near the pump outlet, the controller may have to maintain approximately 4.1 bar at this point to ensure that approximately 3 bar is available at the tallest shower, taking into account the 8m elevation difference and 3m of pipe loss.
The final model should be tested at the lowest inlet pressure and at full 60 L/min demand. This example provides a repeatable selection process: first, calculate the required flow and added head; then, select the pump construction and control mechanism.
V. Conclusion
The first step in choosing the correct home booster pump is the water source and the actual simultaneous demand. If the needed output pressure, vertical height, pipe loss, and minimum inlet pressure are known, the pump head may be calculated, and the right working point found on the performance curve. The final pump type and control mechanism should also be consistent with these results, as well as the installation space and pressure requirements.
If you distribute, retail, or OEM home booster pumps, submit HunGerät your water source, needed flow, pressure, building height, voltage, frequency, and control needs. We can offer matched model alternatives, pump curves, technical specifications, and a quotation for bulk orders relevant to your target market.
VI. FAQ
1. Can a Booster Pump Fix Low Pressure Caused by a Small Pipe?
You can get a booster pump to help with pressure, but that won’t fix the high water loss from a pipe that is too long or too small. Check the pipe size and the flow you need before you go to a bigger pump.
2. Can a Home Booster Pump Increase Both Flow and Pressure?
You can add a booster pump to enhance the available pressure and possibly improve the flow at the outlets, but the water source has to be able to produce that flow. If the input supply is too low, a larger pump could cause low inlet pressure or dry-run problems.
3. How Much Flow Is Needed for Two Showers?
A normal shower can utilize 8-12 L/min; therefore, two showers may draw something like 16-24 L/min before further outlets are provided. Use the actual shower ratings and include any taps, toilets, or appliances likely to run at the same time.
4. Can a Booster Pump Work with a Tankless Water Heater?
Yes, if the pump can deliver the minimum beginning flow and inlet pressure required by the heater without exceeding the maximum pressure. Check the two items simultaneously, because unsteady flow can make the heater cycle on and off.
5. Why Does an Automatic Booster Pump Not Start at Low Flow?
Some flow-controlled pumps require roughly 1–3 L/min before the controller detects water use, but the exact amount depends on the model. A low-flow faucet, filter, or toilet valve may not achieve the starting flow of the controller.
6. Why Does a Booster Pump Start When No Tap Is Open?
A leaking tap, toilet valve, pipe junction, check valve or pressure tank might bring down the pressure and start the pump. Check the pressure gauge after shutdown to see if the system is losing pressure.
7. Why Does Water Pressure Drop When Several Taps Are Opened?
Even if the pump’s maximum flow is high enough, it may not generate sufficient flow at the appropriate working head. Verify the pump curve at the combined flow of all outlets running simultaneously.
8. Can a Booster Pump Be Connected Directly to a Municipal Water Pipe?
Direct connection is only possible if local restrictions allow it and if the public supply is sufficient. In some markets, a break tank is required to prevent the pump from causing negative pressure in the public pipe.
9. When Does a Home Booster System Need a Break Tank?
If direct municipal boosting is not allowed or if the public supply is weak and unstable, a break tank may be needed. It needs to be big enough to meet peak demand and have enough time to refill from the incoming water supply.
10. Can High Inlet Pressure Damage a Booster Pump?
Yes, the inlet pressure + pressure the pump adds can be more than the limit for the pump, controller, tank, pipelines. Verify the system at the greatest anticipated inlet pressure as well as the lowest inlet pressure used for pump selection.
11. Does a Home Booster Pump Need a Bypass Pipe?
A bypass is handy if you want water to be available while the pump is being serviced or if the original supply is occasionally of sufficient pressure. Isolation and check valves positioned correctly are required in the bypass to prevent water from running backward.
12. Where Should the Check Valve Be Installed?
Location depends on pump type and piping arrangement. See pump installation drawing. In a self-priming system, there may be a foot valve at the water source, whereas a positive-inlet system typically includes a check valve to prevent reverse flow.
13. How Should Pressure Tank Pre-Charge Be Set?
The pre-charge is normally placed at around 0.1-0.2 bar below the pressure switch cut-in pressure. Check and adjust when the tank is separated and no pressure is on the water side.
14. Does a Variable-Speed Booster Pump Need a Pressure Tank?
Some of the built-in variable-speed pumps can operate without a big external tank. Others require a small tank to minimize brief cycling. Follow the controller design. Do not remove the tank only because the pump is a variable-speed control.
15. How Much Suction Height Can a Self-Priming Booster Pump Handle?
The practical operating suction height of a pump rated at a maximum suction height of 8 m can be in the 6-7 m range if the installation conditions are good. This height can be even less with long pipes, warm water, high elevation, tiny pipe diameters, and air leaks.
16. Why Does a Self-Priming Booster Pump Lose Its Prime?
Backflow might result from a leaking foot valve, check valve, pipe junction, drain stopper, or mechanical seal. Check the suction system for air leaks before restarting and make sure there is sufficient water remaining in the pump casing.
17. Can the Suction Pipe Be Smaller Than the Pump Inlet?
The suction pipe should generally be at least as large as the pump input. A smaller pipe means more resistance, longer prime time, and less flow to the pump.
18. Can a Home Booster Pump Be Used for Hot Water?
Use the pump for hot water only when the casing, seal, impeller, and controller are rated for the actual liquid temperature. Most common house booster pumps are mounted on the cold water supply side.
19. Can a 50 Hz Booster Pump Be Used with a 60 Hz Power Supply?
Only use when the motor and controller are rated for both 50 Hz and 60 Hz. A frequency change can alter motor speed, flow, head, current, noise, and built-in protection.
20. What Information Should You Provide When Ordering a Home Booster Pump?
Indicate the water source, minimum inlet pressure, flow necessary, output pressure required, vertical height, length of pipe, voltage, frequency, and control technique. Installation area, connection size, noise requirements, and projected order quantity will help finalize the model decision.